Saturday, July 24, 2010

Summer Stripes Bracelet Tutorial


This is an easy project that I whipped up in just a few minutes. The key is to have your iron out and ready throughout the whole process...


You need:
~Fabric
~Thread
~A sewing machine
~Scissors
~A tape measure
~An Iron

Step #1: Cut your fabric into small strips, 4 inches by random measurements. None should have a bigger width than about 1 1/2 inches. Make some thin and some thick. You can use all different fabrics or you can use a few of the same ones in a pattern.

Step #2: With right sides together, sew 2 strips together.


Step #3: Press the seam open with your iron.


Turn the piece so that the right side is up and iron again, making sure the piece is flat.

Step #4: Repeat steps 2 & 3, adding more and more strips to the piece. Stop when you can wrap the piece around your wrist with a bunch of extra room.


Step #5: Return to your iron and make sure the right side of the piece is facing down.
Fold over the edge of the piece, long ways, and make sure that it is folded over 1 inch.


Fold and iron both sides of the piece.


Step #6: Sew the hem on both sides, using a 1/4" seam allowance.


Step #7: Trim the edges of the hems on the wrong side of the piece.


Step #8: Wrap the piece around your wrist and mark where you want the bracelet to connect. Make sure that you can easily put on and remove the bracelet with that sized bracelet.


Step #9:  Turn the bracelet inside out and sew along the mark you made. Using your iron, press the seam open.


Step #10: Make sure that the bracelet fits, and you're all done!


~Have a great day! Hope you liked this tutorial!~

Monday, July 19, 2010

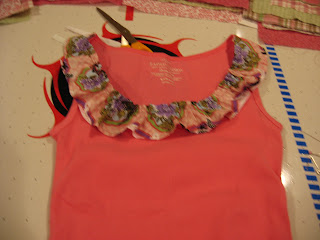
Ruffle Tank Top Refashion Tutorial

I was so excited add a bit of something special to this plain tank that I bought at Walmart for only $3.50!  This tutorial is extremely simple and only takes a little while. Happy sewing!


Step #1: Gather your materials...


A tank, fabric, thread that matches,a seam gauge, scissors, and a sewing machine.


Step #2: Measure the neckline of your shirt, from each of the shoulder seams.


Step #3: Multiply the neckline measurement by 2. (Mine was 18 and when I multiplied it by 2, I got 32 (18*2=32)). This will be the length of your fabric piece. 
Figure out how thick you want the ruffle to be. Add about 1 inch to it and you've got the width. For mine, I wanted it to be about 3 inches thick, so I cut it to be 4 inches.                                                                            Now, cut your fabric using your length and width.


Step #4: Hemming...

Using your seam gauge, fold over and pin each of the sides (all four) of your fabric piece. Sew, using the side of your foot as the seam allowance, which is clearly showed in the picture below.


Step #5: Once all four sides are hemmed, set your sewing machine's tension at 8 or 9, switch the stitch length to the largest, and sew down, lining the stitch on one of the long sides up with the side of the presser foot. 


Step #6: Using the top thread from the stitch, pull and gather to make the ruffle. Continue until the whole piece is ruffled. Line up the ruffle with the neckline of the shirt to make sure that it is ruffled the perfect amount and that it reaches the shoulder seams of both sides easily.


Pin the ruffle onto the shirt once you know it's the perfect size.

Step #7: After setting your tension back to whatever your normal tension is, sew a large-sized stitch along the ruffle's side. Make sure that you catch the shirt in the stitch.


Step #7: Clip the extra few threads laying around and you're done! How easy was that?


Isn't this skirt cute?


Thursday, June 24, 2010

Tutorial: Freaky Peeps!


I think that these things are awesome- and easy to make! They are kind of a home-made version of Ugly Dolls that you can design however you like.

Step 1: Collect your materials...


*Newspaper, computer paper, or any kind of some-what thin paper that is easy to draw on.

*1/2 yd or less-Fabric- I used some that was very thick and soft.

*Assorted buttons- some small, some big.

*Accent fabrics (black, white)

*Scissors and a stuffing tool (I use the end of a pointy hairbrush)

*Creativity- a whole lot of it!

*Hot Glue Gun (not shown)

Step 2: Drawing your creature...

Draw onto your paper. For inspiration (if you need it), you can look up images of Ugly Dolls or other creatures.


Step 3: Cut out your creature...


Step #4: Pin your drawing to the fabric and cut 2.

Step #5: With right sides together, sew along all edges of the creature. Leave a 3-4 inch whole where you will turn it right side out.


Step #6: Turn it right side out


Step #7: Stuff the doll with fiberfill, using your stuffing tool.


Step #8: Sew the opening closed.


Step #9: Cut rig rag or fabric for the mouth and find buttons for the eyes.


Step #10: Glue the eyes and mouth on using a hot glue gun.


~All Done~


Related Posts with Thumbnails